Introduction
I gave this course as a practical class in April 2023, with reveal.js slides hosted on my former blog. I'm bringing it back here as an article, updated along the way, and the original slides are still available at the end.
The goal: understand what an x509 certificate is, what a certificate authority (CA) is, generate your own certificates with OpenSSL, and set up an mTLS (mutual TLS) connection, where the client also authenticates with a certificate.
SSL or TLS?
People still talk about "SSL certificates", but SSL and TLS are protocols, not certificates. Protocols use certificates.
SSL has been obsolete for a long time: today we use TLS, and the French security agency ANSSI recommends using only TLS 1.2 and TLS 1.3. Vendors still sell "SSL certificates" for historical reasons: the name was kept so as not to confuse customers.
Cryptography reminders
Symmetric vs asymmetric
With symmetric encryption, Alice and Bob use the same secret key to encrypt and decrypt. It's fast and suited to large amounts of data, but the key has to be exchanged securely.
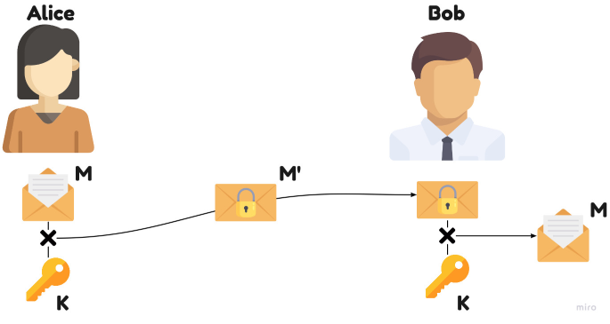
With asymmetric encryption, each party owns a key pair:
- a public key, which can be shared with everyone;
- a private key, which must never leave its owner.
It is (as far as we know today) impossible to derive the private key from the public key. This gives two uses:
- Encrypt: Alice wants to send a confidential message to Bob, so she encrypts it with Bob's public key. Only Bob, with his private key, can read it.
- Sign: Alice signs a message with her own private key. Anyone can verify the signature with Alice's public key, and therefore make sure the message comes from her and hasn't been tampered with.
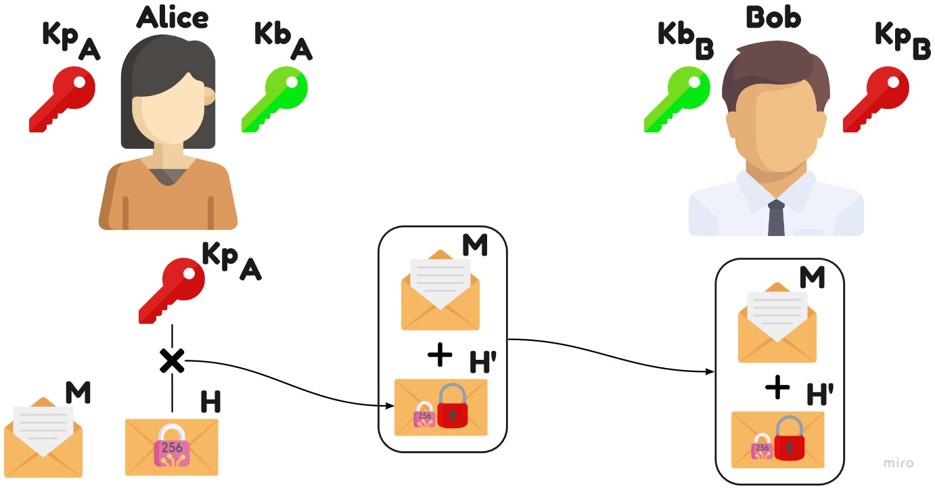
Hash functions
A hash function maps data of any size to a fixed-size digest (SHA-256 for instance). We never sign a whole document: we sign its digest.
Cipher suites
So we have three families of tools: symmetric algorithms to encrypt lots of data, asymmetric ones for key exchange and authentication, and hashing for integrity. A TLS connection combines all three, and that combination is called a cipher suite.
TLS 1.2 example: TLS_ECDHE_RSA_WITH_AES_128_GCM_SHA256
- Key exchange: ECDHE
- Authentication: RSA
- Encryption: AES 128 in GCM mode
- Hash: SHA-256
In TLS 1.3, suites are simplified (
TLS_AES_128_GCM_SHA256): key exchange is always ephemeral and negotiated separately. To explore suites and check which ones are safe: ciphersuite.info.
The x509 certificate
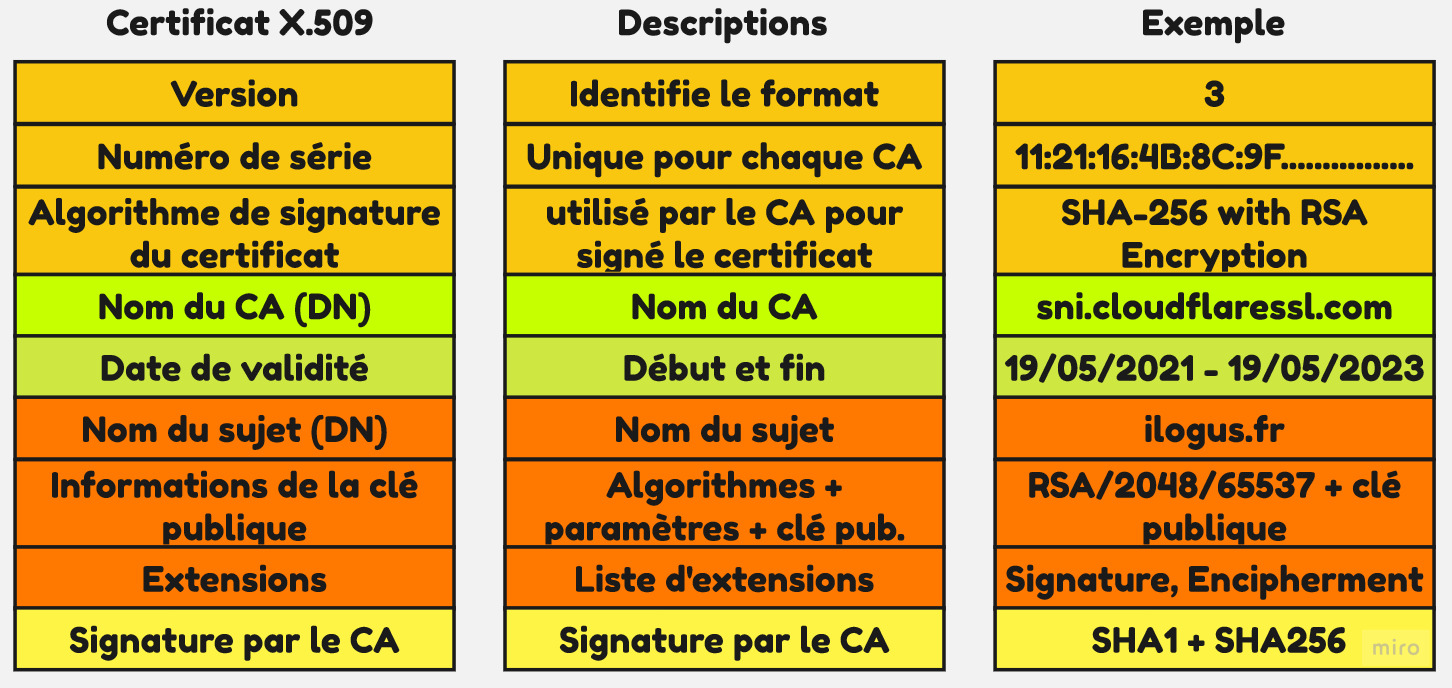
An X.509 certificate binds an identity to a public key using a digital signature. It contains an identity (a hostname, an organization or an individual) and a public key, and is either signed by a certificate authority or self-signed.
In practice, a certificate contains: the subject (CN, O…), the issuer, a validity period, the public key, extensions (allowed usages, alternative names…) and the issuer's signature.
The certificate authority (CA)
The CA vouches for the link between a public key and its owner by signing the certificate with its private key. Anyone can then verify that signature with the CA's public key. That's the foundation of a PKI.
The certificate chain
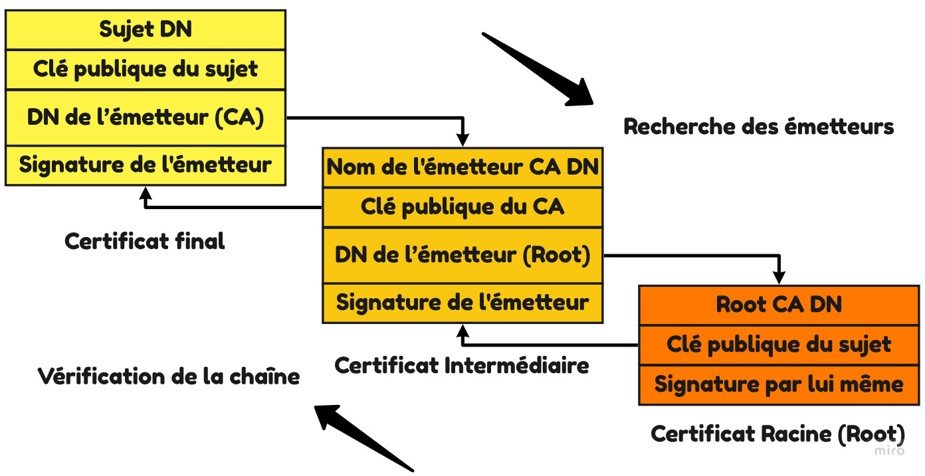
Your operating system and browser ship a certificate store holding the trusted root CAs. A root CA signs intermediate CAs, which in turn sign website certificates. To validate a certificate, we walk up the chain to a known root.
Lab 1: create your CA and sign certificates
Everything is done with openssl, in a working directory.
The CA
Generate the CA's private key, then its self-signed certificate:
openssl genrsa -out ca.key 4096

openssl req -x509 -new -key ca.key -sha256 -days 3650 \
  -subj "/CN=Ilogus Lab CA" \
  -out ca.crt
To inspect the certificate:
openssl x509 -in ca.crt -noout -text
The server certificate
The server generates its key and a CSR (Certificate Signing Request): a request containing its public key and identity, to be signed by the CA.
openssl req -newkey rsa:2048 -nodes \
  -keyout server.key \
  -subj "/CN=localhost" \
  -out server.csr
Certificate usages are defined through extensions. Rather than copying the whole openssl.cnf like in the original slides, a small server.ext file is enough:
basicConstraints = CA:FALSE
keyUsage = digitalSignature, keyEncipherment
extendedKeyUsage = serverAuth
subjectAltName = DNS:localhost, IP:127.0.0.1
The
subjectAltNameis mandatory: browsers and most clients ignore theCNand only check alternative names.
The CA signs the CSR:
openssl x509 -req -in server.csr \
  -CA ca.crt -CAkey ca.key -CAcreateserial \
  -days 365 -sha256 -extfile server.ext \
  -out server.crt
The client certificate
Same idea, with a client.ext file allowing client authentication (and email signing):
basicConstraints = CA:FALSE
keyUsage = digitalSignature, keyEncipherment
extendedKeyUsage = clientAuth, emailProtection
openssl req -newkey rsa:2048 -nodes \
  -keyout client.key \
  -subj "/CN=alice" \
  -out client.csr

openssl x509 -req -in client.csr \
  -CA ca.crt -CAkey ca.key -CAcreateserial \
  -days 365 -sha256 -extfile client.ext \
  -out client.crt
Check that everything is signed by our CA:
openssl verify -CAfile ca.crt server.crt client.crt
Lab 2: an mTLS connection
With regular TLS, only the server presents a certificate. With mTLS, the server also requires a client certificate, signed by a CA it trusts. It's widely used between services (internal APIs, IoT, admin access).
Start a test server that requires a client certificate:
openssl s_server -accept 8443 \
  -cert server.crt -key server.key \
  -CAfile ca.crt -Verify 1 -www
Without a client certificate, the handshake fails:
curl --cacert ca.crt https://localhost:8443/
With the client certificate, the connection succeeds and the server returns the TLS session details:
curl --cacert ca.crt --cert client.crt --key client.key https://localhost:8443/
In production, it's the same principle with Nginx:
ssl_client_certificate /etc/nginx/mtls/ca.crt;
ssl_verify_client on;
During the original class, we did the same with Postman (Settings → Certificates) and watched the handshake in Wireshark, comparing TLS versions. It's a great exercise to see certificates going over the wire.
Going further: Extended Key Usage
The keyUsage and extendedKeyUsage extensions restrict what the key can be used for: a serverAuth certificate shouldn't be able to authenticate a client, and vice versa. That's what we did with the .ext files.
To import your client certificate into a browser or mail client (S/MIME signing), bundle the key and certificate into a PKCS#12 file:
openssl pkcs12 -export -out client.p12 \
  -inkey client.key -in client.crt -certfile ca.crt
The course slides
Here are the original course slides. Navigate with the arrow keys or the space bar, or open them full screen.
Conclusion
An x509 certificate is a public key, an identity and a signature binding them together. Once that idea clicks, CAs, chains of trust and mTLS feel quite natural. With OpenSSL and a few .ext files, you have everything you need to build a complete local test environment.